Xavi Anguita shared the process of creating his Eye Generator, a procedural tool that allows you to control multiple parameters including the Iris, Pupil, and Sclera veins, and also mentioned several talented artists who helped him learn SD. The Eye Generator is available for purchase here.
In case you missed it
You might find these articles interesting
Introduction
Hi there!
My name is Xavi Anguita and I’m a Senior 3D Artist working on AAA games at elite3d. For the last 3 years, I’ve been working on many different games at this company, such as Vigor, Overkill’s The Walking Dead, and many others under NDA.
My story with 3D began 12 years ago when I started learning different 3D software on my own due to my interest and facility to work with three-dimensional space. Thanks to what I learned practicing at home, I was able to start my first job as a Texture Artist at an info architecture studio at the age of 18. Most of my daily tasks were basically tiling textures by hand in Photoshop, but I learned a lot from it and I also started learning incredible ways to speed up my workflow in different areas and software. A short time later, I became a 3D Artist and my main responsibilities were creating high-quality 3D models for Vray, Unity, and Unreal Engine. After a few years, I finally became a Supervisor in a small team doing real-time and VR projects in Unity and Unreal Engine for web and standalone apps. My main responsibility was to achieve the best possible quality and to decide on the workflows we were going to use to work with outsourcing companies.
Six years later, I was hired by elite3d as Environment & Prop 3D Artist.
Enhancing the Workflow with Substance Designer
I was introduced to the nodal workflow through Unreal Engine 4 and Filter Forge in Photoshop. I started doing the common material tiles: pebbles and procedural wood for the info architecture industry. The final target was to create realistic renders for companies such as Ikea, Roca, Leroy Merlin, etc.
Then, in 2015 or so, I discovered Substance Designer, and all the knowledge from the previous experience helped me start developing tools and materials really fast. I went right into FX nodes to create my own tools because it allowed me to control everything when duplicating shapes, which was amazing!
Now, I work as a 3D Environment and Prop Artist and I use Substance Designer for almost everything I do. You can’t imagine the advantages you obtain from using it in the industry, not only to create materials but also to automatize and generate tools from scratch.
I created nodes that adapt maps from the previous projects to match the new requirements, a node to generate infinite amounts of buttons, a PBR checker that follows the project specifications (now it’s by default in Painter), and many others.
Eye Generator: Goals
Sometimes, no matter what I’m doing, I look at something in real life and start wondering about the way I could do that in 3D and whether it could be done in a procedural way. Suddenly, without realizing, I’m already thinking about how to do it. In this case, I was thinking about a pair of blue eyes that captivated me. My goal then was to get realistic results in a fully procedural way by giving the artists the opportunity to create unique eyes in an easy and simple way. I wanted to offer them the possibility to personalize the eyes as much as possible by playing with the pupil shape, the colors and gradients, the iris pattern, and even the amount of veins.
Sometimes, it’s really hard to know if you are doing things right at the beginning of a project, so, when working on my portfolio, I generally have 2 different projects at the same time. In case I get frustrated with any of them I just jump into the other for a while. This technique helps me to see my work with fresh eyes and allows me to be more demanding and objective with my work.
Now that I’m done with this tool, I can move forward with the other one that I’m developing, which also means I should start looking for an extra one too!
Graph Breakdown
Even though this can’t be considered a step-by-step tutorial, I will try to show you my workflow and some of the tools that I’ve created for this graph. As you will see, I’ve used a lot of my own custom tools that I created in the past. These tools were mostly done by using FX nodes, pixel processor, or simply atomic nodes.
First of all, I started working on the basic shape of the iris by analyzing how it is made in real life and asking myself how I could split it into shapes and merge them together.
Let’s take a look at the graph!
This graph is divided into sections. I worked on the Pupil (Green), Iris (Yellow) and Sclera (Purple) and then combined them all by using blend nodes (Orange). Usually, I do create nodes for each step so, in the end, this main graph contains a lot of small nodes that are created apart.
- Pupil:
In the following Gif, you will be able to see that this part is really simple. It’s basically a couple of switch nodes that allow you to choose between multiple shapes.
The chosen main shape will be subtracted later on to blend with the Iris. As you can see, if you subtract a blurred shape to the base of the “nerves” they will fade into black and this will produce a depth effect that blends the input shape with the Iris nerves.
- Iris:
First, I needed to create the base made by “nerves”. What I did was to create one node that drew lines in a radial pattern and created a similar effect of how they would look like in a real eye. As this was meant to be a tool and I didn’t want to make it too heavy in terms of computation, I made 2 different seeds that are rotated with a transform 2D and blended with different heights to create the final height map.
Afterward, I started working on the shape that separates the 2 heights from the Iris. This section is a combination of various tools. For example, the radial spots are made with a tile sampler and shape mapper that uses the Pupil input to create the main shape.
I used a combination between this node and the input of the Iris to create a base shape and then I used warp node to deform and achieve this final look.
Once this shape is done, I simply add a radial pattern to create the huge waves of the upper part of the Iris with a blend node in multiply mode.
Then, I use this as a mask to blend 2 different patterns of veins with different heights.
Now that we have the base of the Iris, we need to create the rounded shape that separates the Iris from the Sclera. This is hard to explain because this step uses many dependencies from different parts of the graph, so I have created a simpler version to explain it.
First, I used a subtract node with a blurred shape to the Iris height to create depth. Afterward, I blended a lighten ring with Max (Lighten) to clean the border and get a nice transition between the Sclera and the Iris.
This is an example of another custom node that I use a lot. The last node that is connected is called Simple Selection and it’s a pixel processor that compares two input images and output white when the pixel is the same color. So the result is a nice mask based on the height of the first input. Not sure if this is clear enough, you can comment below if there is any question about it.
You usually get super clean and unrealistic results when working from scratch in Designer, so what I did was to add a surface noise based on the same height map. This composition works really nice, it’s basically a slope blur with 2 inputs. The first is a BnW Spots2 and the second one is a blurred version of the height map. I used this map on top of my height map with an Add (Linear Dodge) with a blend node.
- Sclera:
For the Sclera, I used a node that I created time ago to generate cells with more control than the existing one. This node was originally created to generate cracks. It allows you to choose the position of the cells and then applies 2 different warps: a big one to break the lines and a small one to make them irregular. Then, I use the same technique as for the Pupil with a subtract node.
This is another cool technique I used to give roundness to the veins in the height. It’s about adding an “edge detect”, then using “distance” with an “auto levels” to normalize the greyscale. This allows you to use “curve” at its maximum potential. Because I wanted all the veins to be created with the same shape I simply saved this in a separate graph and then created an instance to the main one as you can see at the top of the image. Working in this way makes everything cleaner in the final graph, you can also modify all the values at the same time by instancing the parameters.
To finish with the explanation, I would like to show you one last trick. This is a technique I learned from CGtextures that helps you to exaggerate the normal maps in Photoshop. You can increase the value of the normal map by overlaying it with a blur. It’s a really cool method that gives more volume to your normal map.
Left side is the common normal map from height; Right side is the overlayed normal map:
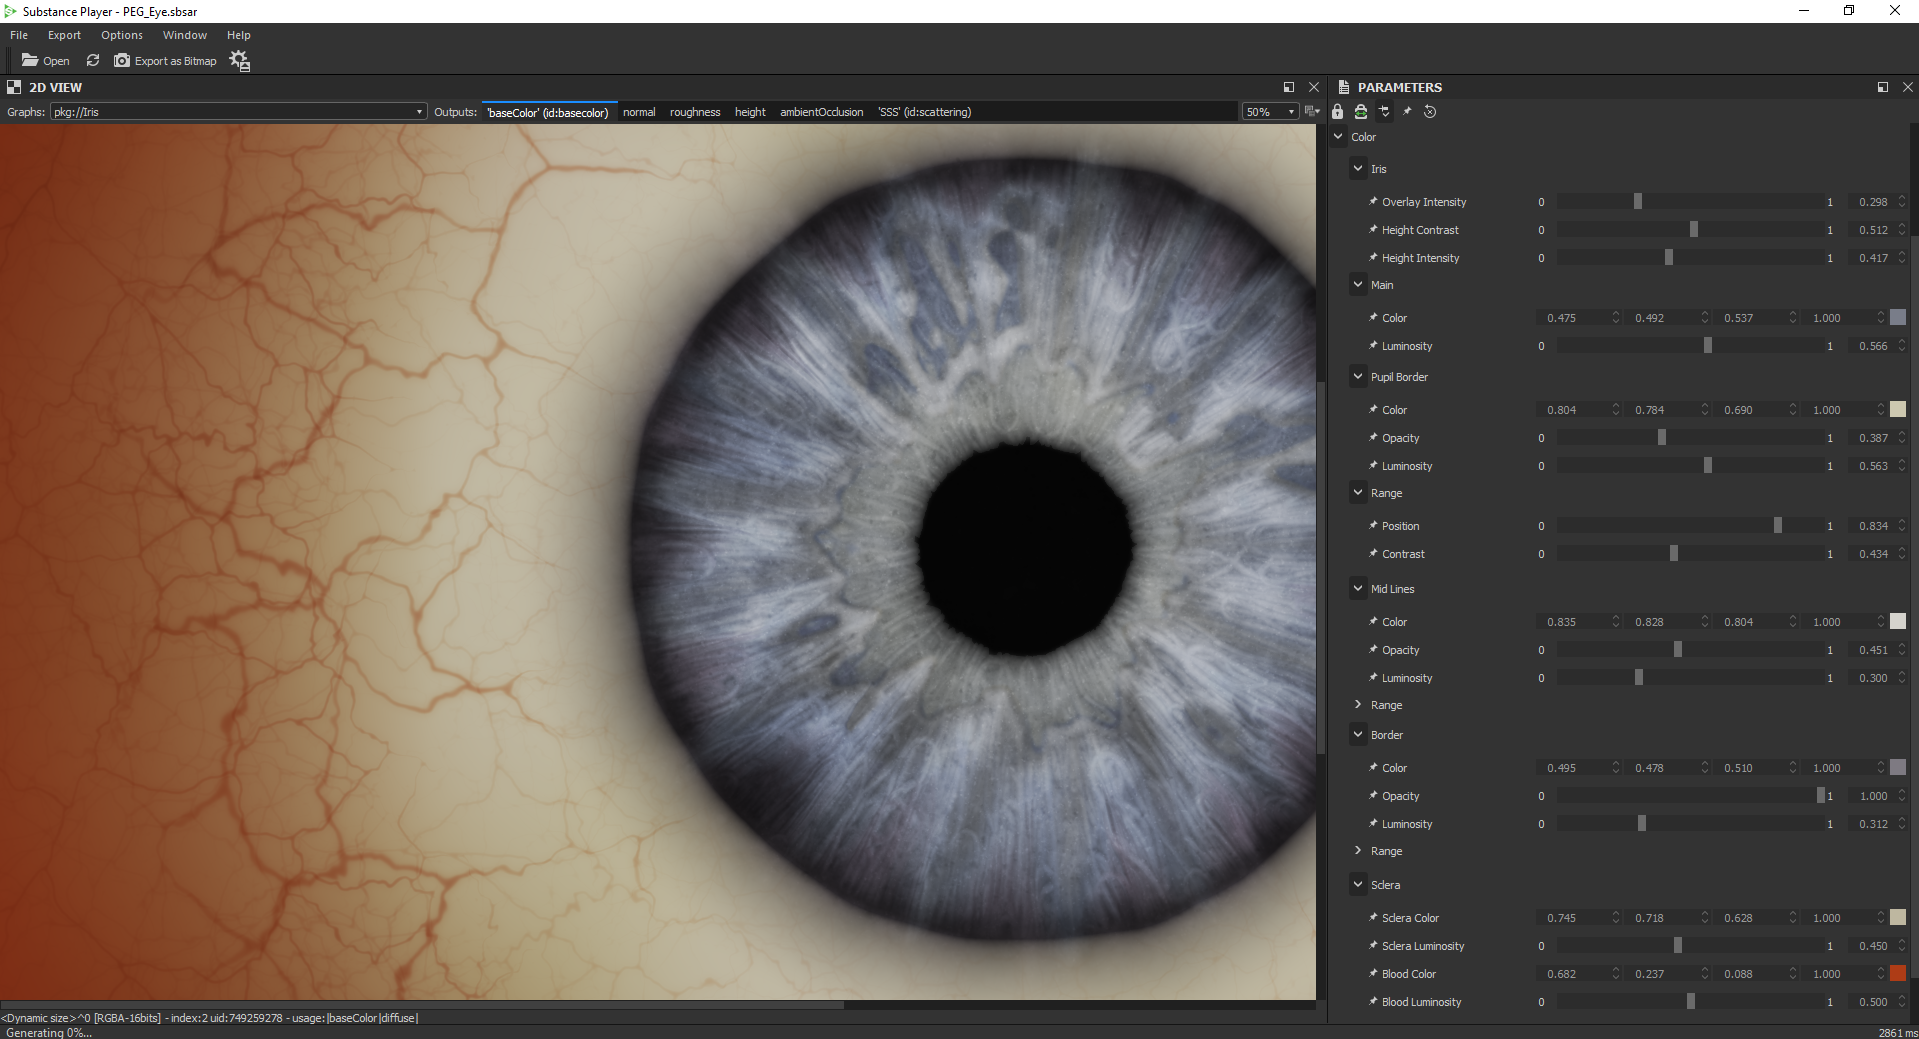
Customizable Parameters
When creating tools, it’s not always easy to know what should remain open for the user. If you don’t give enough options, the user will not be able to customize the result, but if you leave too many options open, the user could feel overwhelmed. In the case of the Eye Generator, I tried to keep it as simple as possible for the artist to use but giving him at the same time freedom to create his own eyes. This way, I decided to group all the options in two different sections: Iris and Crystalline. The Iris is also divided into 2 subgroups: Shape and Color. Under the Shape tab, you will be able to choose the size of the pupil and iris, as well as the shape you would like to use as a pupil and decide if you want the iris to be generated based on a pupil or a simple circle. Then, I also opened a couple of values to allow changes in the Sclera veins to make them look like the blood pressure is higher. On the other hand, Color tab will allow the user to change the colors of the eye using 4 colors, which are the following:
1) Main color is the base color.
2) Pupil border is meant to be the color right around the pupil.
3) Midlines are those lines that usually define the second height level on the Iris.
4) Border is the color that is in the outer ring of the Iris, usually darker than the rest of the eye.
I also added a slider that overlays the colors so that artists can have more contrast between them and another overlay that uses the height information to give more detail to the base color.
Crystalline, on the other hand, allows you just to change roughness and normal map of it.
Here is a video of how it works:
The node works in Substance Designer, Painter, and Player. I’m also working on the final tweaks to make it work in Unreal with the eye shader that Epic has developed, which is completely amazing!
Take a Break
Speaking of the challenging aspects of this project, I could answer with just one word: quality. An artist can always improve his work, no matter what. Something is never good enough. When working with established deadlines, you need to balance the time you have to spend on a task and the results you consider good enough to reach the requirements. When working on a portfolio you don’t have that time pressure, so you can always make your work improve just by investing more time. Taking this into account, it’s always really hard for me to decide when something is good enough to call it done.
During this project, I got stuck multiple times when working on the colors of the iris. I wasn’t being able to get nice results and I started to feel frustrated about it. This is why I decided to put the project on hold for a while. Four months later, I went back to it.
Sometimes, it’s better to take a break when working on your portfolio so that you can take a breath and come back with fresh ideas. In this case, thanks to the break, I managed to solve the issue that made me temporarily abandon the project in just half a day.
Every time I work on a project, I create a Pure Ref with different work in progress screenshots. This is always a gigantic source of motivation for me as it easily allows me to compare the first steps with the final looking ones and it makes me feel good to see how much I’ve improved along the process.
For Those Who Want to Learn SD
Thank goodness nowadays there are multiple forums, websites, and places where you can learn from many artists. Some of the artists that I have learned the most from are the following:
- Adan Martin (Spanish). This guy is simply amazing. For those who speak Spanish, I highly recommend seeing ANY of his tutorials on youtube. I’ve learned a lot from him and not only about Substance Designer. He has a lot of tutorials on material creation, PBR, modeling, V-Ray, etc.
The great documentation of Allegorithmic it’s a must:
- The PBR guide, Part 1 and Part 2
- Vincent Gault. I’ve learned a lot from his videos on youtube, especially the technical stuff (he has a really nice tutorial for an eye generator on his channel).
- Any of Jonas Ronnegard's Substance Masters
- Ben Wilson, Vinicius Ribeiro, Ilan Shoshan, Enrico Tammekänd, and many others
- Finally, one artist I’m learning a lot from lately is Andrei Zelenco, who is constantly posting new stuff in the Substance Designers group on Facebook that simply blows your mind.
I still find myself in a constant process of improvement, but for someone who wants to learn the software, the best thing I could recommend is to enjoy every hour that you spend playing with Substance, even if it’s only to investigate. You can’t even imagine the number of things you can learn only by using nodes in a different way than how you would normally do.
Xavi Anguita, Senior 3D Artist at elite3d
Interview conducted by Arti Sergeev
Keep reading
You may find this article interesting